Raspberry PI and Java ME IOT PROJECT
LIGHT LED WITH A MOTION SENSOR
Long since i did anything interesting in java/javafx, i was a little caught up on a 6 month gig with Kenya Open Data building dashboards in d3.js a JavaScript library.
Back to java ,more specifically Java ME 8.3 (Java Micro Edition 8.3) a platform running on an embedded devices. Which includes the Device I/O API that allows you to control devices such as LED,switches,sensors .etc. more on Java ME 8.3.
Hardware used
Raspberry PI 512 MB Rev B+
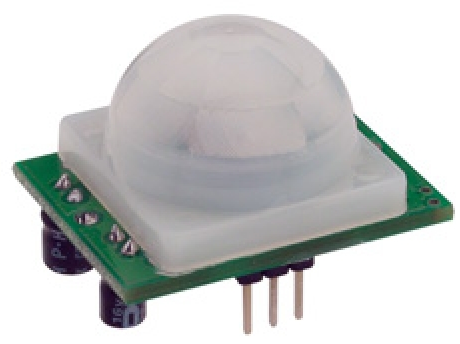
PIR Motion sensor HC-SR501
LED 5 mm Diffused BLUE
Resistor 220 ohms
Jumper wires male to female and male to male.
Breadboard
Since the PIR sensor can be connected to the raspberry pi directly,we will use the breadboard for the LED and the resistor to limit the LED current,this how the connection looks like
 |
| breadboard LED connection |
The yellow wire is the ground wire connected to the cathode(-) of the LED,the other end of the wire connects to pin 25/Ground of the raspberry pi.
The red wire is connected to the anode(+) of the LED,the other end of the wire connects to pin 12/GPIO18.
Underlined in the image below.
 |
| LED GPIO Connections |
To make sure it works before writing the code,i think its best you test if the LED works by connecting a 5V charger to the connection,yellow wire(-),red wire(+).If the LED lights you can now connect to the raspberry pi GPIO.
The PIR sensor connection is as below,i didn't change any configuration in the sensor.
 |
 |
| PIR sensor |
 |
| PIR sensor Connection |
 |
| PIR sensor GPIO connections |
The Code
NetBeans 8.2 doesn't support Java ME ,i had to use NetBeans 8.0 and you need Java ME SDK 8.3,add the Java ME platform to NetBeans .NetBeans has a step by step on how to do so here even though the steps are for NetBeans 7 and JDK 7 ,its the same process for JDK 8 and NetBeans 8.0.
Next you need Java ME Embedded 8.3 for Raspberry Pi model B,download here ,you will need two copies one for the Pi and the other for your Computer.
Unzip the Java ME Embedded on the Pi and change the permissions of bin directory and appdb directory
$ sudo chmod -R 777 appdb bin
cd to the bin directory and start the Application Management System (AMS) on the Pi
$ sudo /bin./usertest.sh
We add the Pi to the Java ME SDK Device Manager ,check the icon in hidden icons on the taskbar
click and a Add Device Connection dialogue will appear ,enter the IP address of the Pi click OK and we are set for coding now.
 |
| Device Manager |
Accessing any device connected to the Pi you need to request for permissions in our case we use the following permissions.
jdk.dio.DeviceMgmtPermission "*:*" "open"
jdk.dio.gpio.GPIOPinPermission "*:*" "open"
or you can specify device name like so
jdk.dio.gpio.GPIOPinPermission "GPIO18" "open"
To add the permissions in NeatBeans IDE, go to project properties click the project properties dialogue appears ,on categories click on Application Descriptor ,then click on API permission tab,click add to add permissions.In the drop down list choose
Permission :
jdk.dio.DeviceMgmtPermission
Protected Resource Name:
*:*
Actions Requested:
open
Now that we have requested for permissions lets see how to light an LED in Java ME, the code below does it.
  try {
           GPIOPin gpio_pin=(GPIOPin) DeviceManager.open(pin_id);
           gpio_pin.setValue(true);
        } catch (IOException ex) {
           System.out.println(ex.getMessage());
        }
Note that the DeviceManager class opens the device with a device id which is not the same as device mapped on the board,here is a GPIO preconfigured list.examples
GPIO18 on the board device id is 4.
GPIO22 on the board device id is 5.
The sensor code is the same but we have to listen for motion detection continuously,which calls for a thread,if the sensor detects motion the digital out signal goes high/true and if no motion detected digital out signal goes low/false.
The full code github.
Oracle Java ME Embedded Developers Guide.Very useful resource for getting you started.

This comment has been removed by the author.
ReplyDelete